Wednesday, September 8, 2010

Painting Progress: Dining Room Complete

We've been painting like mad over the past few weeks and have made some major progress. The latest room to be transformed is the dining room. The red walls and gold metallic ceilings were begging us to paint over them since the day we bought the house. The ceilings are now white and the walls are a rich, flat-finish tan. The beautiful wainscoting and box beam woodwork were painted glossy black at some point in the past and we decided to keep the black (anything else would have been SO much more work!). In the end I'm so glad we did--the glossy finish of the black reflects the lighter wall and ceiling colors and doesn't feel as dark as it originally did.

We also swapped out the old (read 70's gaudy and tacky) chandelier for the new model we purchased a while back. When the new chandelier arrived we were surprised to see it was quite a bit more red than was advertised. But over the past few months the red grew on us and now I absolutely love the unexpected, rich pop of color it gives to the room.

Here's what the dining room looks like now:

Here's what we started with:

Before and after shots:


Wednesday, August 18, 2010

Master Bathroom Progress

While we've been busy painting downstairs, a steady stream of contractors have been working their magic upstairs in our master bathroom. Here's a quick run-down of what's been going on:

Electrical Progress:
- Added breaker to the electrical box for new whirlpool tub
- Wired and installed an outlet for the new whirlpool tub to plug into
- Added a second electrical outlet to the wall that will be home to our double vanity
- Wired the new air vent (complete with additional light and heater)
- Added a second double-light switch to control the air vent, light and heater (given that there will be four light switches for the bathroom, it may take me a while to figure out which switch does what!)

Plumbing Progress:
- Pipe adjustments were made to the tub/shower area to accommodate the new tub
- The new whirlpool tub was installed
- The previous single-faucet plumbing was split into two faucet connections
- The toilet to floor connection damaged when the old toilet was removed was replaced

Shower Window Upgrade:
- Old, damaged window (that didn't open) was replaced with a brand spanking new window that actually opens

Tile Prep Work
- Cement board was applied to the shower area and the floor

Wall Repair Work
-The wall that was opened up for plumbing work has been patched

Here's some snapshots of the progress:
My dream come true...two faucets!
Drywall repaired around the new faucets.
Our new whirlpool tub in all it's glory!
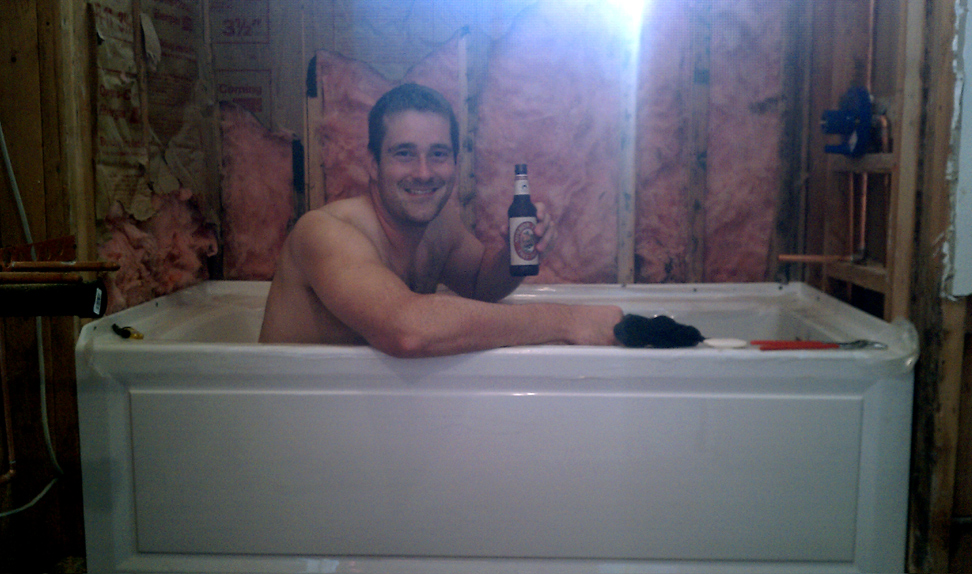
David couldn't resist testing out the new tub after a long day of working on the house--beer in hand!
He didn't mind having to turn the water on and off with a wrench.


Before: Water damaged wood window that didn't open.
After: Beautiful new vinyl window that will resist water damage and OPENS!

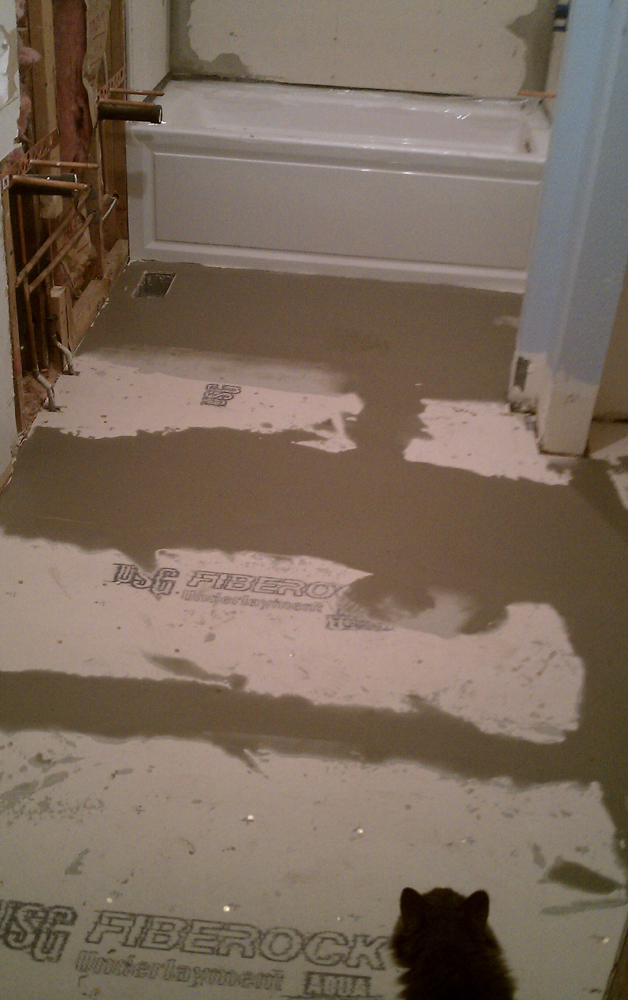
Inspector Poof checking the cement board progress on the floor.
Cement board installed in the shower area.

Next up the drywall repair will be sanded and textured, and the room will be ready for paint! We've picked out a beautiful light blue color and I can't wait to see up on the walls! Stay tuned. :)

Just for fun, here's a comparison of what we started with and what it looks like now. Even the unfinished bathroom looks a million times better than it did before!

Monday, August 9, 2010

More Painting Completed: The Living Room

Next up in the long line of rooms to paint this Summer was the living room. The walls and ceiling started out  the same dirty, tan/beige/yellow, dull color. We couldn't wait to paint the ceiling white which really opened up the room. We painted the walls the same fresh, brighter yellow that we used in the entryway and did some major touch-up to the black trim. Overall the transformation wasn't shockingly huge, but the room looks so much brighter and feels so much more open now!

Here's a glimpse of the new living room followed by some before and after breakdowns:


Tuesday, August 3, 2010

The entry and stairs have been painted!

Here's what the space looks like now:


A Before & After breakdown:


Click here for the DIY curtains post.


The next step will be to remove the tile flooring and restore the original wood flooring underneath.That will begin as soon as we finish painting the other rooms on the main level.

Monday, August 2, 2010

Marathon Mulching

We had one unit (7.4 yards) of mulch this delivered this past Friday. The before photo doesn't really do justice to how massive the pile of mulch was to begin with--it was as deep as it was wide. And after three days of shoveling, dumping and spreading mulch we only have a few wheel barrows full left.

Adding mulch to the slopes and garden areas was pretty straight forward but the parkways required a lot of work. They were overflowing with dirt, grass and weeds which all had to be removed and both sides of the parkway had to be edged. Unfortunately, the dirt was beyond rock-hard and even the edger we borrowed from our neighbor wouldn't make a dent in it. David ended up using a shovel and some serious brute strength to get the edging done. One shovel broken in half mid-way through the job! That gives you an idea of how hard the dirt was (or how crappy our shovel was).

The "pile" -- before and after
David edging the parkway right before the shovel broke.
The mulching is done!!
The last two pieces of the puzzle in the back yard are adding the veggie garden and extending the fence all the way to the retaining wall.
We used the left over mulch to cover all the garden areas including this newly landscaped spot.
After much manual labor, our yard finally looks presentable! We lost count of how many neighbors and passer-bys stopped to comment on how great the place looks. It's always nice to hear that others are enjoying the fruits of our labor as much as we are.

The final phase of landscaping is to plant the laurel hedge. That should be delivered and planted very soon (famous last words...)!

Friday, July 30, 2010

Guess what we finally have....

After 473 days of living in our home we finally have a back yard with grass!!! The hardy, drought-resistant sod was delivered and installed yesterday. In my opinion, this is the most glorious moment in our home improvement adventure so far. There is something about not having a back yard to escape to that leaves me feeling unsettled. I can't wait to spend a few hours sprawling out in the grass and relaxing in the sun this weekend.

The new sod doesn't come without responsibility--twice daily watering will be required for the next three weeks. David took on the first morning watering session today.
The dirt patch you see on the right will become our veggie garden!
The West side "yard"
The East side yard

Tuesday, July 27, 2010

Phase Two of Interior Painting Begins

After our four-month long stint of painting the upstairs last Summer, we took some time off to enjoy life without a paint brush or roller in our hands. Now we are back at it and taking aim at the main level of the house. I'm beyond excited to paint over the mauve stairway and entryway, the yellow/beige/tan in the living room, the red walls and metallic gold ceilings in the dining room and the bright wasabi green color in the kitchen.

First up is the entryway and the staircase leading to the second story. The walls, ceilings, staircase risers and front door are all getting a fresh coat. Here's a few before pics and some updates on progress we've made so far.

Before pics of the entryway and landing:

Here's a before shot of the staircase leading upstairs next to a photo of the staircase primed. What a huge difference already!

 Here's a preview of the progress we've made in the main entry area. The first photo shows the space primed and the second shows it after the first coat of paint was applied. It's amazing how much larger and brighter the space feels!

The goal is to finish painting the space this week and move on to the living room next week.

Monday, July 26, 2010

Project Backyard: Flat-Out Fantastic

We made major progress in the backyard this past week. There is, for the first time ever, level ground on the side of the house, level ground in the back yard and an evenly graded slope of dirt from the level yard areas down to the retaining wall.

It took some doing to achieve all this. A massive weed forest had sprouted in the bare dirt left behind after the cement work was completed. Waist high grasses, dandelions on steroids, thistle thickets and vines were well on their way to taking over the yard in just three short weeks! It took David, his trusty weed whacker and a little aid from (nasty) chemicals to reclaim the yard. Next, our handyman Enrique and a 15-yard dirt delivery entered the picture. Enrique tilled, flattened and graded the dirt, and added a layer of landscaping fabric under the dirt on the slopes. The base for a back yard had been created!

Next up, the flat areas will be topped off with sod, the slopes will be mulched and a row of English Laurel will be planted where the mulched slope meets the retaining wall to create a hedge. Eventually, there will also be a veggie/flower garden added to the mix.

Here's how it looks as of now:

Thursday, July 22, 2010

Master Bathroom: Smashy! Smashy!

David showed our master bathroom who was boss over the past week! He ripped out the shower tile, removed the shower doors, removed the bathtub, removed the toilet, removed the floating shelf that cut through the room and (apparently) used to be in style, removed the vanity and mirror, chipped away the tile flooring and opened up the wall where plumbing and electrical work will be done. It was quite the task but David accomplished it in record time! He's pretty much a pro at destroying rooms in our house by now. :)

It wasn't a surprise to find the original douglas fir flooring underneath the tile as we've found it in every other room of the house--although a portion of the flooring near the (non-existent) door was removed and patched with plywood at some point. It was a surprise to discover a fairly level base flooring surface on which to put cement board and new tile! Our guest bathroom floor situation did not prove to be so user-friendly.

The room is now ready for electrical and plumbing work which will begin next week!!

Click here to see the bathroom pre-destruction.