Wednesday, June 9, 2010

Poured...AGAIN!

There have been a few trials and tribulations with the driveway project which has been ongoing for almost three months now. I'm happy to report it's finally close to being done. The exposed aggregate section of the driveway didn't turn out well the first time so it had to be removed and poured again. Luckily...the second time was the charm and we now we have a lovely new driveway, garage floor, stairs and side walk. After a little more sealing work and a two-week drying period we'll be able to drive up the driveway and park on the garage slab!

Here's how it turned out:
Let the landscaping begin!

Thursday, May 13, 2010

Poured!

At long last, today they finally poured the garage floor, driveway, stairs and walkway. Now they just have the sidewalk patch, approach and curb to go (well, and touch up and sealing, of course).

We're THRILLED with the results. The exposed aggregate concrete ties in to the house and existing wall just as we imagined. And it's so great to see the project take such a big leap forward toward the vision that's been in our heads for months.

I can't wait until it's sealed and done, but sadly, after the seal is on we'll have to wait another two weeks for additional cure time before we can drive on it. Wait wait wait wait wait. My birthday is in two weeks, so maybe my birthday present will be off-street parking, at last!!

For those not familiar, exposed aggregate is as easy as 1-2-3:

1. Form and pour.
2. Lightly spray the concrete with a retarder solution, which is essentially sugar water. The retarder will slow the setting of the very top surface layer, allowing the underlying concrete to harden while the exterior layer remains soft.
3. The difficult part... When the concrete has become hard enough to carry a worker's weight without messing up the aggregate, the surface is washed with a hose and scrubbed with a broom to remove the top layer of retarded cement. This requires a bit of technique and finesse, as care must be taken to not displace the aggregate or expose it too deeply (leading the aggregate to lose it's bond, letting stones pop out and generally messing up your finished look).

Here's a video showing the progress and the crew working on the aggregate-exposing step 3 mentioned above...


Wednesday, May 12, 2010

Project Backyard: Update

The backyard is continuing it's transformation! The dry well has been installed, the dirt back filled and leveled, gravel put down, the curb removed for the new driveway and the previous driveway removed to make way for a new curb.

Here's a current snapshot of the back yard. A lot of work is being done this week so we'll have more updates soon!

Guest Bathroom: Major Progress!

The guest bathroom renovation is moving right along. We're getting so close to the end we can taste it! The latest task to be completed was the tile work. 1" white hex tile was used for the floor and classic white subway tile was used for the shower enclosure and bench. We are really happy with the way it turned out!

Click here to see what the bathroom looked like when we started.

Thursday, April 29, 2010

Project Backyard: Now with Access!

Kelly: "David, I just got home, and the house smells like gas and is full of smoke!"
David: "Um, yeah, that's because they are using a gas saw."
Kelly: "Using a GAS saw? That's a real thing?"
David: "Yeah, it's a two-stroke motor with a blade attached to it. I used to sell them."

...and that's about as interesting as I can make a post about installing a door where there wasn't one previously. As relatively un-interesting as it is, however, I am very glad to say that we now have a door from our basement to the outside world.

It's amazing what a door down there has done... We can now get into the backyard area without walking around the house. We can now move things in and out of the basement without maneuvering them up the stairs. We can now feel how the flow of the home will change once the basement is finished, usable space that connects to the outside world. And, we can now add an additional bedroom to the basement without having to add egress windows. Hooray!

One quick tip - Kwikset Smartkey Door Hardware and Locks. We used these in the new door, and it allows you to re-key the lock to any key in about 30 seconds. Waaay easier and more convenient than a locksmith.

Some before and after:


Monday, April 26, 2010

Guest Bathrom: Tub is in place

We have been making solid progress on the guest bathroom renovation. The cute mini-tub was installed, the drain was moved and plumbing adjusted, and the bench that bridges the gap to the wall has been constructed. It doesn't look like much yet, but soon enough it will look like a real bathroom again. I can't wait!

Sunday, April 25, 2010

A beautiful day in the neighborhood!

I'm so glad Spring is finally here and outdoor projects are starting up again! Before Winter hit we had a french drain put in. This left the side yard a muddy strip of ugly land.Since then weeds, random bulbs and grass have taken over.While enjoying the beautiful day I did some serious weeding, planted hostas and ferns, and put down a thick layer of mulch. VoilĂ ! The side yard now looks like this...

Monday, April 5, 2010

Project Backyard: Now with Footings

While we enjoyed a wonderful trip to San Diego to celebrate the engagement of two beautiful people (congrats Erika & Scott!), our contractor was hard at work on the backyard.

The rest of the footings were poured:Forms for the stem walls also went up:

Wednesday, March 31, 2010

Project Backyard: Forming Forms

Things continue to progress in the backyard. Forms for the concrete footings are beginning to take shape!

Monday, March 29, 2010

Kitchen Demolition Begins

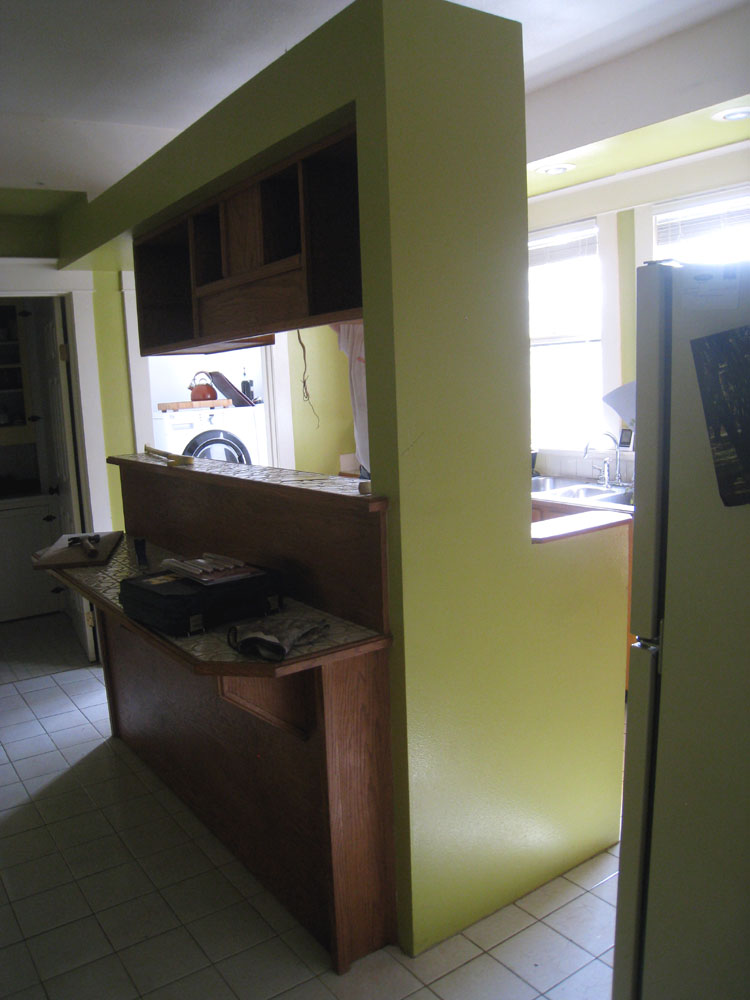
At some point someone decided it would be a good idea to construct a free-standing structure complete with cabinetry smack dab in the middle of our kitchen in order to house the vent for the range. Not only did the large and obtrusive structure make the kitchen feel much smaller than it really is, but it separated the breakfast bar from the rest of the kitchen and blocked the view between the kitchen and the dining room. It also blocked light from the two large kitchen windows from getting to the breakfast bar area and the dining room.

Here's the play-by-play:Any job that requires power tools, is a job that makes David happy. A big thanks to Sean for his expert demolition assistance and to Paul & Stacey, who know how to make crow bars and safety glasses look good.

Sunday, March 28, 2010

House Tour

As we gear up to do several major renovation projects, I thought it would be fun to post a tour of the entire house as it was the day we moved in. The house in this tour is about to become a distant memory and I can't wait until these 'before' pics are replaced with amazing 'after' pics. :)

Click here and enjoy the tour!

Saturday, March 27, 2010

Copy Cat Chic: Veranda Round Chandelier

One of my favorite blogs is Copy Cat Chic. It's a perfectly simple blog that finds cheap-yet-chic alternatives for chic-but-expensive home decor pieces. It's such a great idea for a blog and a great resource for affordable decor finds. When I stumbled upon a chic deal of my own today, I decided it was time to do my first post channeling Copy Cat Chic. Here goes...

Veranda Round Chandelier
sold by Pottery Barn
$349 + $34.90 shipping = $383.90
BVR-8W Veranda Round 8 White Shade Wood Chandelier

sold by general-lighting (eBay store)
$119 + free shipping = $119
It's the EXACT same chandelier at a savings of $264.90. And it will soon be hanging above our dinning room table!

Thursday, March 25, 2010

Guest Bathroom: Less Floor is More

Removing the layers of flooring which have accumulated over the past 99 years was the latest guest bathroom demo project.

In the shower area, there were two layers of
linoleum and three layers of plywood to rip up. In the rest of the bathroom, there were two layers of linoleum, two layers of plywood, a surprise layer of original tongue-and-groove Douglas Fir (a sweet surprise!) and a layer of metal.

David removed all the layers down to the original fir. Our goal is to salvage the fir to use as patches for the master bedroom floor (click here to see the wall we tore out) and the soon-to-be hole in the kitchen floor.

First the linoleum was removed:
Then off came the plywood:David's saw blade was the first to meet this layer of metal:We were pretty excited to discover original fir floors:Project 'Save The Fir Floors' begins this weekend. Click here to see what the bathroom looked like before demo began.

Sunday, March 21, 2010

Project Backyard: Excavation Continues

The backyard is quickly taking shape! Most recently the walls of the future garage were marked and holes for the footings were created.I hope you all enjoyed the BEAUTIFUL weather yestereday! :)

Wednesday, March 17, 2010

Project Backyard: Excavation Begins

After months of painstaking planning we were finally able to break ground on the backyard!

Here's what it looked like before:
After two dump truck loads of dirt were removed, piles of back-fill dirt were created and a somewhat level garage floor began to emerge from the mudpit, here's what it looks like now:

Wednesday, March 3, 2010

Guest Bathroom: Take THAT!!!

Smashy smashy make David happy.

Before:
After:
Before:
After:

Monday, March 1, 2010

Guest Bathroom: The Design Plan

Here's the design mood board for the guest bath remodel. The goal is clean lines, classic details and a light color scheme to help brighten the small space.
Breakdown
Light Fixture - Northwestern 4 by Schoolhouse Electric
Pedestal Sink - Kohler K-2267-0 Memoirs Pedestal Sink in white
Sink Faucet - Metropolatin Bath Facuet, widespread
Shower/Tub Hardware - Vintage Tub & Shower Chrome Faucet
Toilet - Kohler Devonshire Two-Piece Elongated Toilet
Storage - Classique Wall Cabinet
Paint Colors - (the same fantastic combo used by Jessica Helgerson in this bathroom) Benjamin Moore AF-685 Thunder at 25% (semi-gloss) and Benjamin Moore OC69 Regal Matte white
Floor Tile - 1" hex tiles in Ice White
Shower Tile - 3"x6" Subway tile in white
Shower Curtain - Essence Fabric Shower Curtain, White, Target
Medicine Cabinet - Original 1911 medicine cabinet, stripped and repainted
Bathtub - Used bathtub, resurfaced

For a reminder of what the bathroom looked like before demolition started, click here. We've got a long way to go!